 |
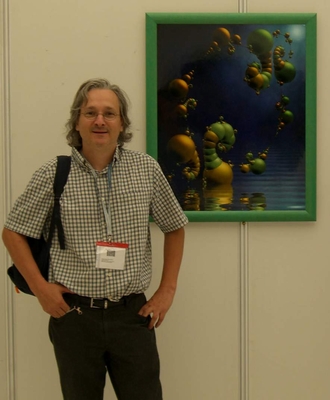 |
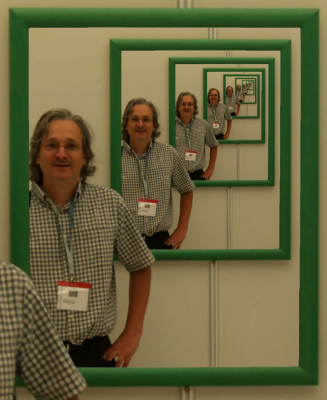
How to turn the image on the left into the image on the right?A small user guide for the Ultrafractal 'Droste effect' UCL.The picture
on the left was taken during the exposition of the Benoît
Mandelbrot Fractal Art contest in Madrid, 2006.
The person in the picture is Etienne Ghys Thanks to Etienne for letting me use this picture. |
 |
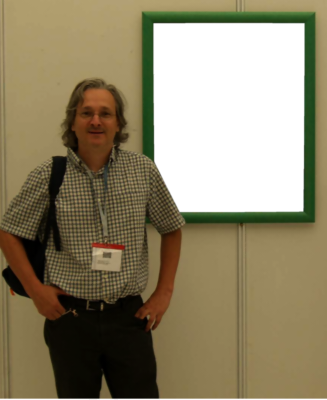 |
Step 1We need to create a transparent region in the image. This
can be done with Photoshop or similar
progams, but also with the "Image Nibble" UCL in jos.ucl.
The image with the transparent region will be the starting image for the Droste effect. Important: this UCL only works with imported images! The transparent region can be any shape, not necessarily with straight lines like in this example. The only condition is that the shape contains a point on the inside that can 'see' the complete rim of the transparent shape. The UCL can also be used on images without a transparent area ( Pattern parameter), but then the shape that will be repeated needs to be perfectly circular or rectangular. |
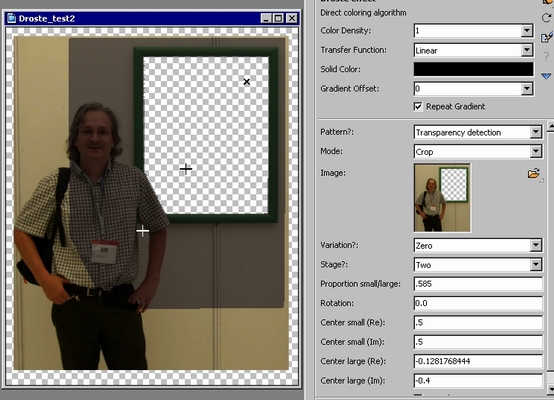 |
Step 2In Ultrafractal set the formula to Pixel.. In
the Outside tab, open Droste effect in
jos.ucl, and open the image with the transparent area. Position it so
that the
transparent area around the image is visible.
Take the eyedropper from Center small and click somewhere in the transparent area. The darkened area is similar to the transparent area, in other words, it is a larger copy of the transparent shape. The size of the darkened area can be adjusted with Proportion small/large. The position of the area can be adjusted with Center large. The easiest is to do the repositioning roughly using the eyedropper, and then to fine tune using numerical input. Keep the darkened area completely inside the image. That is why it is best to position the image so that the transparent area around it is visible. The darkened area can also be rotated using the Rotation parameter. A rotation on this image would cause the darkened area to cross the edge of the image, so we don't do a rotation here. |
Center small and Center large are not exactly the right words, as these points are by no means the geometrical centers of the transparent shape and the darkened shape. (You can see where they are in the image: they are indicated by the crosshairs.) What will happen now is that the darkened area will be copied, shrunk and placed in the transparent area, and this will be repeated indefinitely. The "cross" crosshair indicates the limit point after an 'infinite' number of ever smaller copies of the darkened area have been put into the ever smaller transparent area. |
|
Step 3Change the Mode parameter to Transform.Reposition to obtain an image like the one on the left. Finished! Note that the Variation parameter is at Zero, and the Stage parameter is at Two. See below for information on varying these parameters. |
 |
Change the Stage parameter to One. The image that this generates will not win prices, but it shows the tiling that takes place to generate an infinite number of copies of the darkened shape. More information on the mathematics can be found here. |
 |
Change
the Stage parameter back to Two
and change the Variation
parameter
to Alfa.
We now get a spiral. Instead of 'pictures in pictures' there is a continuous image that runs versus the limit point. This is done by rotating the tiling above through a certain angle, and by a scaling. Choosing -Alfa will create a spiral that runs in the opposite direction. There are three other Variations: 180-alfa, 180, 180+alfa. In general, they produce less interesting images, but in some cases the result is spectacular. The compiler messages generate some interesting information. As we get and endless repetition in the image, its is possible to zoom in and rotate (if necessary), and end up with an identical image as before the zoom started. It is of course impossible to do this by hand accurately. the compiler messages generate the information needed to do this. This allows making endless zoom movies. See an example here. |
 |
 |
 |
 |